Interactive Bees
How do you bring a printed poster on a wall to life? You make it the home of some bees - bees of the pixel kind.
This article tells the story of how Andrew Sage worked with Communication Design student, Xanthe Bodington, to bring her 4th Year Degree Show poster to life with digital projections.
Interactive bees
Having previously worked with Xanthe Bodington on our graphic novel, The Price, she asked me to provide the technical element to bring part of her Degree show installation to life.
Xanthe had this to say about her project:
My degree show’s project was focused on bees and pollinators. I wanted to raise awareness and communicate the importance of bees and pollinators in our local environment, their decline and how one can help. I wanted to communicate this through interactive means so that the audience is actively engaging in the project and learning though hands on experiences. My aim was to demonstrate that by taking part in my project you are already taking a step towards helping bees and pollinators on an individual level.
The goal was to have an A0 size poster printed with the infographic about the bees. Areas of the poster would then have touch sensors on that would trigger animations that would be projected on to the poster.
An additional but still important goal was a Knowledge Exchange between myself and Xanthe. At the end of this Xanthe should have the skills to build future installations using the platform I had developed.
Early experiments
The initial plan was to use a Raspberry Pi Model B connected to capacitive touch areas on the poster. Initial tests were done using buttons on a breadboard to trigger the inputs. This would allow Xanthe to play with a prototype and begin building the visual display part of the installation. Despite initial success things started to go wrong. It would work when I built a prototype but then fail when taken on site.
Also the presentation software we had intended to use did not live up to our expectations. After discovering that the presentation software was very clunky to use I decide that being a developer it would be easier to write something from scratch that would do exactly what we required. However, that coding project would have to wait until we could reliably get inputs being detected.
Pros
- Cheap hardware
- Often used for this kind of thing so off the shelf software available
Cons
- Input into Raspberry Pi was very flaky – was our device faulty or were we doing something fundamentally wrong?
- Raspberry Pi's video output was via HDMI but our projector had no HDMI input – tracking down the right connector could solve this
- Presentation software on the Raspberry Pi was very clunky to use
Second attempt
The second attempt was to use a Bare Conductive Touch Board with the Raspberry Pi. The hope was that the Touch Board’s built in handling of capacitive sensors would eliminate our input issues. However, we ran into the same problems as before and now we had the added issue of the Degree show approaching.
Pros
- Bare Conductive Touch Board handles all the capacitive processing for us thus eliminating a potential failure point
Cons
- The same problems as before
Back to the drawing board
With time running out it was time to go back to the drawing board and try a different approach. Out with the Raspberry Pi and in with a full computer. Having used Unity for other projects we decide to give it a go for handling the presentation and control it directly via serial input from the Bare Conductive Touch Board.
Pros
- Removal of the temperamental Raspberry Pi
- Complete control of the presentation via a bespoke Unity app
- HDMI output
Cons
- A computer was required
- Unity wouldn't accept the video files
- Serial input via USB into Mac was too temperamental to be practical thus limiting us to a computer running Windows
Almost there
Initially the Bare Conductive Touch Board was connected via USB to a MacBook Pro running Unity. However the serial input reading appeared very temperamental. Some investigation online seemed to indicate that the the MacBook was not best suited for serial reading via USB.
Switching to a laptop running Windows 10 resolved this issue and finally we had a reliable input being picked up by Unity.
The first version of the Unity app displayed static images in response to a hand being waved in front of the target trigger areas.
Due to Unity not allowing video files to be loaded and played we decided to create our own simple animation class. This class was then expanded to allow optional looping and random movement. With this in place Xanthe was able to setup the animation sequences as she required without needing to know anything about the underlying code.
The source frames for the animations were created in Adobe Premiere and when initially exported were of too large an image size. Through trial and error, and much running between computer lab and exhibition space, between us we established the correct sizes to use.
And then it all stopped working! The animations froze and everything locked up. Restarting the app brought things back to life and then it froze again.
The Arduino code running on the Touch Board was, as per the many examples I'd found on the Internet, sending the touch states a line at a time via use of println. Unity was reading the serial port using readln.
The problem was Unity was waiting for the end of line from the board and getting stuck when none was received and causing the animation lock up. When working with just static images prior to animating we had not noticed this bug.
The code on the Touch Board was rewritten to send a stream of bytes instead of writing out a line at a time. The corresponding code was changed on the Unity side to handle the stream of bytes instead of waiting for the end of line to be received from the Touch Board.
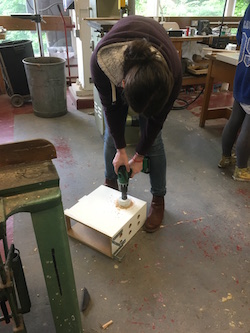
Wiring up the poster
After the initial hanging, the wires did the thing that wires do naturally – they tangled themselves into a spaghetti! The touching wires triggered false signals and Unity was getting very mixed signals. In order to combat this we had to tape each wire to the floor and make sure none of the wires crossed. From there we slowly shortened the wires so that it all fitted neatly into the corner beside the poster.
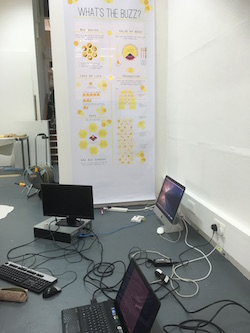
Setting up the projection
Now that the interactive elements were working and the animations playing correctly on the computer screen the next step was to get it projecting correctly on to the poster.
Several issues had to be taken into account:
- Brightness of the images in a well-lit room – would we have to add a canopy to the installation to reduce external light pollution?
- Position the projector far enough from the poster to provide a big enough interactive area.
- Ensuring that the user would not stand in the way of the projection whist they were interacting with the poster.
- The projector required a secure and safe housing that still allowed access for turning it on/off and adjusting the settings.
The Unity app was developed and tested running in the standard landscape format on the computer screen. However the projector it was connected to was rotated to project a portrait image on to the portrait poster. This required the camera in Unity to be rotated 90 degrees to compensate for the projector’s rotation.
In order to work out the exact position of the animations in relation to their appearance on the poster we setup a grid to act as a guideline. Using this, and much trial and error, we were able to correctly position each of the elements.
Due to the high resolution of the frames that formed the animations we did encounter some performance issues. In order to rectifying this we scaled down the size of the image files without any visual loss of quality.
Historic Hardware Issues
A key part of the setup was a computer to run the Unity based software from. Initially we were offered a Mac laptop. However due to the serial via USB issues with OS X, we had to turn down that option. This is when we started to run into problems. Due to the department using Apple computers there were no modern Windows computers available.
First we were provided with a laptop running Windows XP. The first problem encountered was that an operating system last updated in 2008 could not comprehend a 0.5 TB USB hard drive so we could not install the any of the software.
A low capacity USB stick was used to install Arduino and Bare Conductive drivers. Arduino and its drivers installed successfully. However, the Bare Conductive drivers failed to install due to its installer being unable to detected that Arduino had been installed.
Next up was a Windows 7 desktop. The Arduino and Bare Conductive drivers installed with no problems. Our Unity based software installed with no problems. However, when it was run we were presented with a blank screen. A browse through the log files indicated that the problem was the hardware. The computer had a graphics card that could not load in all the resources we were using.
In the end we ended up using a modern laptop with a decent graphics card running Windows 10. What started out as a cheap interactive installation using a £80 Raspberry Pi had turned into a more expensive installation with a £1000+ laptop at its heart.
Success
Everything was now in place and wired up. The app was started, Xanthe reached out towards the poster and the animated bees beamed to life on the poster.
Contact Us
Contact at SymboticaAndrew | Email imagine@asae.co.uk | Telephone +(44) 7834 774991